Don’t Breathe The Magic Smoke!

I plan on doing a LOT of soldering going forward. I have several retro projects that require fixes and new boards, and I plan on adding some animatronics to the big Halloween display we do every year.
What I'm acutely aware of is that soldering can produce smoke, which if you are close enough to the tip (which I tend to be, as my eyesight isn't as good as it was, and I tend to do small component type work), you end up breathing in that smoke.
Which, of course, isn't that healthy. You'll see a lot of proper electronic repair shops have dedicated smoke extractor units. I wanted one of these, but a bit more portable/cheaper.
Checking the internets, I saw that I'm not alone in this. Many people re-purpose PC case fans and a filter to suck the smoke away from their nostrils.
Being the sort of person who would rather spend a few hours making something rather than dropping 30 quid on a pre-made item, I set to work designing my solution. Except for the filters, I already had everything I needed:
- One 120mm PC case fan, three-wire version (the four-wire ones use PWM speed control, which makes them unsuitable). I have loads of these spare.
- Some legs for the fan to stand on as it would be too low to effectively 'catch' the smoke. I can 3D print these.
- A grill to hold the filter on the back of the fan. I can 3D print this.
- A switch to toggle the fan power on and off. I have many of these.
- A small plastic box to hold the switch and its wiring. I could 3D print this, but I have some tiny ABS project boxes that will do.
- A 12v 1a Power supply. I have a box FULL of old power supplies. This one's easy.
- Some filters to place on the back of the fan, behind the 3D-printed grill. I DON'T have these, but these Charcoal Filters on Amazon are a perfect fit. I can easily upgrade to better ones if I need to.
Designing the legs for the fan
I use DesignSpark Mechanical for my 3D design work. It's an odd choice, but I don't like web-based apps, and I was looking for something better than the ancient copy of Sketchup I had been using, and DSMs UI just made sense to me. I rarely see any other people talk about using it, so I guess it's not that common.
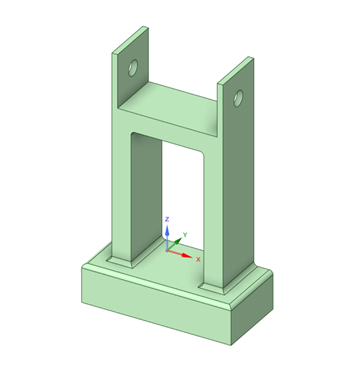
3D design for legs of the 120mm fan (print two of them)
Designing the fan grill to hold the filter
The grill to hold the filter needed to be a lightweight design, as I didn't want to impact the airflow any more than I had to – the filter would be adding enough resistance as it was.

3D design for a grill for a 120mm fan
My design style is very much function-over-form. I don't like waiting for 3D prints to finish, so I tend to keep the designs as simple as possible. As long as they do the job they were designed for I don't care what they look like.
Putting it all together
Assembly just needed 6 fan screws. Really simple to do:
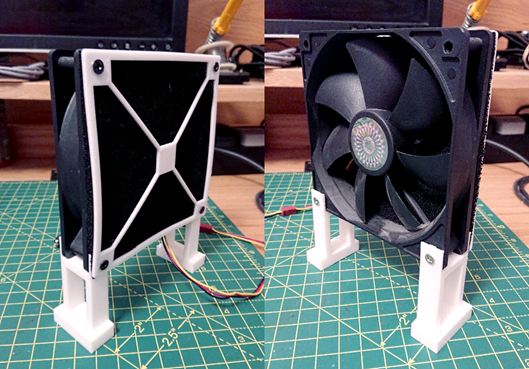
No fan grill on the front. I like to live dangerously! ;p
I then added the little ABS project box with a switch in it (sorry, no picture of that), and then hooked it up to a large old-school 12v power supply (what the Americans call a 'wall wart').
It's pulling a lot of air on testing, so it should serve its purpose. If I need to make changes or upgrade the filter… well, the beauty of self-builds like this… is that you can always build a better one!
With that in mind, things I would have done differently:
- Build the switchbox inside one of the legs.
- Create a raised edge around the grill to prevent it from bending as much.
I wanted to make this using mostly what I had lying around, so with that in mind, I'm happy.
Thanks for reading this entry in my humble blog. I write these to aid my memory in the future and to help embed the habit of writing more content. I post infrequently, but I'd be honoured if you added me to your RSS feed or bookmarks.